
Princess Mary
June 6, 2025

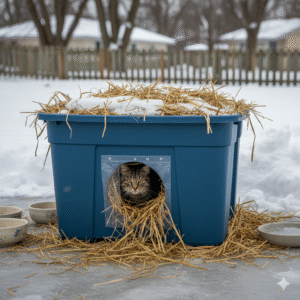
Winter Shelters Save Lives!
DIY Feral/Stray Cat Winter Shelter (Plastic Tote + Straw)
This makes a wonderful project for parents and children to share, offering a fun hands-on way to learn about volunteering while strengthening family bonds. It’s a meaningful opportunity to teach kids kindness toward animals, responsibility, and the importance of helping those in need—all while creating something that truly makes a difference.
A simple straw-insulated tote shelter, plus daily food and water, can protect stray cats from dangerous winter weather. If you can’t bring a cat indoors, building a basic shelter and adding a little catnip can help keep them safe until long-term help is available.
Materials Needed
- 1 large plastic tote (approx. 30–50 gallons; heavy-duty, with lid)
- 1 smaller plastic tote that nests inside the larger one leaving a few inches of space on all sides
- Box cutter or utility knife
- Duct tape or Gorilla tape
- Straw (NOT hay, NOT blankets — straw insulates and stays dry)
- Optional:
- Styrofoam sheets or rigid foam insulation
- Brick or paver (to weigh down the lid)
- Weatherproofing tape
Step-by-Step Instructions
Step 1: Prepare the Entry Hole
- Choose a side of the large tote, a few inches from the bottom.
- Trace a 5–6 inch round or square opening — just big enough for a cat, small enough to hold heat.
- Cut the hole carefully using a box cutter.
- Use weather proof tape to reinforce the edges to prevent cracking or sharp plastic.
- Cut the same hole in the smaller tote so they line up exactly.
Step 2: Add Insulation Between the Two Totes
- Place the smaller tote inside the larger tote, centered.
- Fill the gap between the totes with loose, fluffy straw (or rigid foam insulation pieces). This layer keeps cold air out and warmth in.
- Once insulated all around, put the lid on the smaller tote.
Step 3: Insulate the Interior
- Fill the inside of the smaller tote with several inches of loose straw.
- Create a cozy, nest-like bed area.
- Leave enough room for the cat to move but keep the space small to trap body heat.
- Keep everything loose — do not pack the straw tightly.
Step 4: Seal and Weatherproof
- Place the lid on the large tote and snap it tightly.
- Seal edges with duct tape if you want extra wind protection.
- Add a brick or paver on top if wind is a concern.
Step 5: Placement Tips (Very Important)
- Elevate the shelter 2–4 inches off the ground using wood pallets, bricks, or boards; keeps moisture out.
- Face the entrance away from blowing winds (usually north or west).
- Keep it in a quiet, hidden area near bushes, sheds, or porches.
Step 6: Maintenance
- Replace straw every 1–2 months, or anytime it becomes damp.
- Very Important: Do not use blankets, towels, or hay — they absorb moisture and become dangerously cold.
- Check that the entrance remains clear of snow and debris.
-
- Optional Upgrades
- Double-entrance escape route (only if predators are a concern).
- A foam cooler can replace the smaller tote and works extremely well; you can also use Styrofoam shipping boxes (like those from Omaha Steaks) by taping two or more together, cutting entry holes on opposite sides, and leaving one end sealed so only one side is exposed to wind.
- Heated water bowl placed outside, never inside the shelter.
- Optional Upgrades


